Background
In recent times I have become concerned that perhaps I am not giving my yeast enough of the love and care that they require to efficiently ferment a wort. I grow starters of decent size when working with liquid yeast but occasional long extended drawn-out fermentations, and the increased frequency of me brewing high gravity beers have led me to look at how I can give my yeast a better environment in which to do their thing.
One such area is in the aeration of wort, prior to pitching yeast. We all know that our liquid yeast requires a healthy amount of Oxygen in the wort. Simplifying the science a great deal, a well Oxygenated wort will result in better yeast growth and increased overall health of the little buggers and they’ll do a better job of fermenting your beer.
Because Oxygen is driven off during the boil, we need to re-introduce it to the wort before the yeast is pitched. There are numerous ways that brewers are told they can do this….aeration either by splashing being a common one…this is often achieved by a variety of methods such as repeatedly pouring the wort vigorously from one container to another and back again, using devices in transfer tubing to cause the wort to spray about a bit, whisks on the ends of hand drills etc. Some folks opt to use aeration pumps with an inline filter. Or there is the option of “injecting” pure O2 directly into the wort.
My own method of aeration for the past couple of years has been the use of a Venturi device on the end of a drill. Effectively a vented whisk on the end of a long tubular shaft, when spun the rotation of the shaft causes air to be drawn in via several holes/slots and forced down the shaft to the slots on the whisk head and out into the beer. This certainly makes a nice foam after a couple of minutes…but how effective is it really at introducing O2?
Well, the device is drawing in air…and as we know only 21% of the air that we breathe is oxygen…so already we can see there is a natural limitation of such aeration methods that use air as the source of Oxygen. Add in the fact that there may well be plenty of airborne microbes, dust particles etc and who knows what else you are introducing into your beer.
02 requirements
The ideal amount of O2 required is dependent upon several factors…wort gravity and fermentation temperature being two of the most important. Simplistically, the higher the gravity and colder the fermentation, the more O2 will be required. It is generally accepted that yeast need 8ppm as a minimum level of dissolved Oxygen…typically when fermenting with Ale yeast strains up to a gravity of 1.060. Start moving into beers with gravities above 1.060, or venture into the world of Lager yeasts and you will be wanting higher levels of around 14ppm dissolved oxygen in your beer.
Generally, manual methods of wort aeration (whisks, aeration pumps) will only achieve levels around 8ppm, simply because of the limitation of O2 in the air. To get more O2 into the wort….you need a purer source. This is where I am at and, over the last month have set up my own O2 system for aerating wort.
Parts List
Setting up an O2 system is simple and should be no more challenging than setting up a CO2 system for carbonating your beer. What you need is…
- A source of pure O2
- A regulator suitable for your O2 cylinder
- Some form of flow control
- An aeration stone
- Tubing to connect the regulator to the aeration stone
O2 sources come in two forms…refillable tanks containing up to several thousands of litres, or disposable tanks containing a couple of hundred litres or so.
So how big a cylinder do you require? Well…given that it is generally thought that a delivery rate of 1 litre per minute of O2 for 1 minute, into 5 gallons, is enough to get you to 8ppm, and a further 60 seconds at the same rate will get you to 14ppm you can see that for most brews you will get away with no more than 2 litres of O2…a 200 L cylinder will last roughly 100 brew days.
I chose to go for a 110L disposable cylinder (2.2L physical volume) from the Welders Warehouse…
Oxygen Cylinder 2.2 litre Disposable- THE WELDERS WAREHOUSE
Obviously, you need an appropriate regulator for your gas bottle, again I sourced mine from The Welders Warehouse…
Oxygen Regulator for Disposable Cylinder – THE WELDERS WAREHOUSE
Finally, a means of flow metering/control….yes, the regulator can vary the flow depending upon how much you open the valve, but it can be a bit coarse…plus you do not actually know your flow rate unless your regulator has a built-in flow meter. Use of this alongside the regulator valve allows you to finely tune your flow rate. Dozens of inexpensive flow control meters exist but ideally you want one that will allow you to adjust your flow rate to around 1 – 1.5 L/minute. From Jeff Bezos’ site I purchased…
My aeration stone/wand came courtesy of the Malt Miller…
2 Micron Oxygenation/Aeration Wand Kit | The Malt Miller
I did however replace the 2-micron stone with a 0.5-micron stone from The Homebrew Company. Smaller holes result in smaller bubbles which have a relatively larger surface area and therefore increased solubility…
Carbonating Stone with 1/4-inch MFL 0.5um – The Homebrew Company
All you then need is some tubing to connect it all up…I used 3/16th Valpar gas line as it is a lot more flexible than the 3/8ths stuff….I just step-up using John Guest fittings to 3/8ths so that it connects to the barb on the flow meter and the end of the wand more easily. I have heard reports that Silicone based tubing is not suitable as it is a lot more flexible and tends to expand under pressure and is difficult to get a controllable consistent flow rate.
I had the tubing and JG fittings lying around so my total outlay was around £110.
The above is what I chose to purchase, you may find that a different set up meets your needs (e.g. you may wish to choose refillable O2 cylinders). I have no personal connection with the named suppliers, other than being a generally satisfied customer.
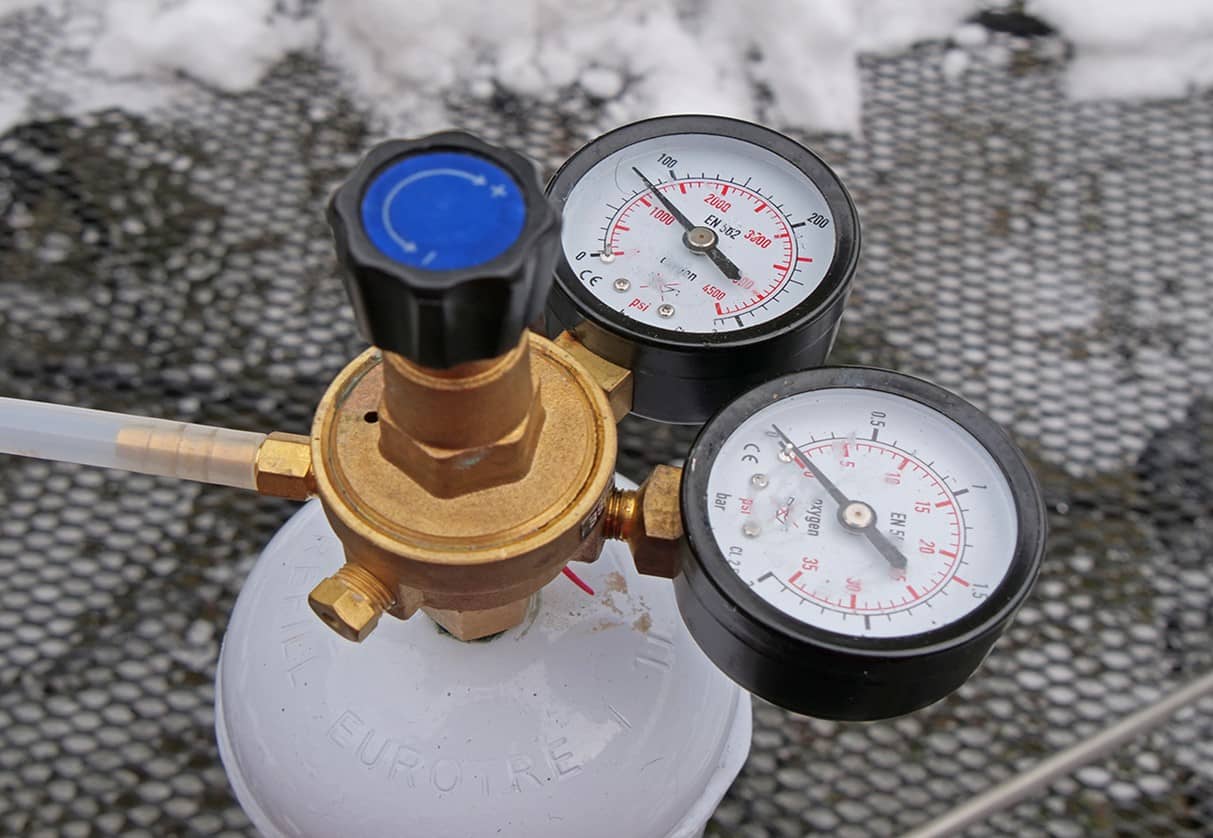
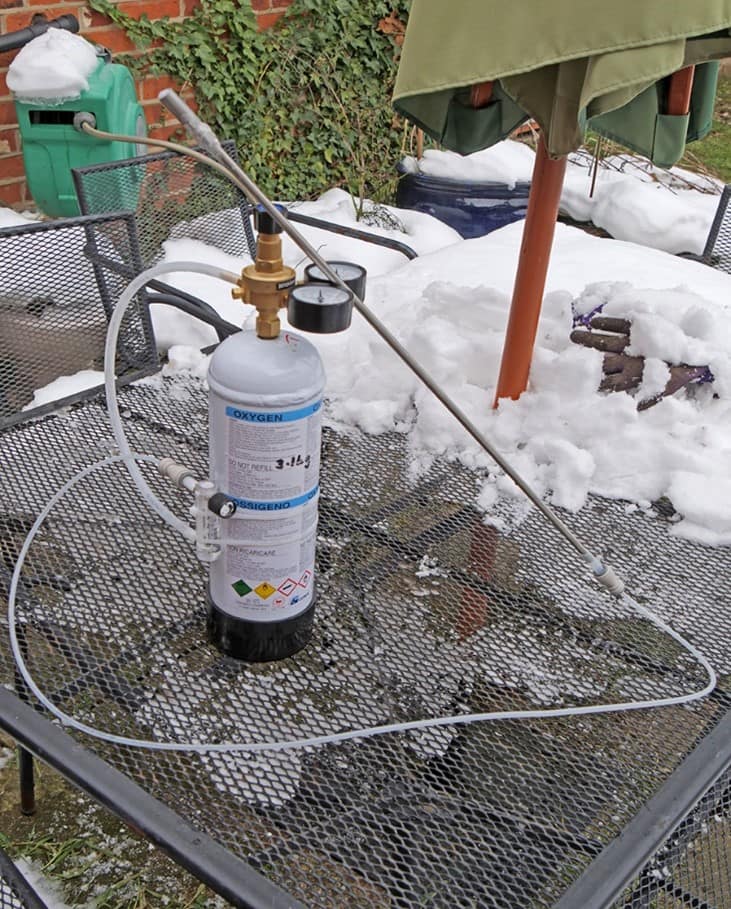
The completed system
The following images show the whole set-up, note that the flow meter needs to be oriented vertically otherwise it will not work (2nd pic) – well it will, but you will not get an indication of flow rate!! When operating, the little black ball will rise and given an indication of the flow rate which is controlled by the black knob. The dial on the regulator towards the top of the 3rd image allows you to gauge how much is left in the cylinder.


How does it work?
Well….I’ve only done two brews this year using the new method of aeration. Both using yeast that I have never used before, so it is difficult to draw any conclusions at this early time, though my initial gut feel is that fermentation has been a little speedier. This weekend though sees me getting back on familiar brewing territory with a style and yeast that I am familiar with, so I am looking forward to seeing the results and will update this as and when I have more experience.
As an additional plus…there is no reason why you cannot use your O2 system to oxygenate yeast starter wort.
Warning! The Dangers of 02
As we know, Oxygen whilst not itself being flammable, does support combustion and care must be taken during its use. It goes without saying that O2 should not be used in areas where naked flames and equipment that is likely to produce sparks exists and obviously smoking should be strictly forbidden.
The risks of fire in Oxygen enriched environments are considerably increased and materials which do not normally burn in air may burn vigorously or even spontaneously.
It goes without saying that anyone looking to use pure O2 as part of their brewing process needs to familiarise themselves with the risks and take appropriate precautions to ensure the safe use of O2.
See the site below for more information.
Nice article – well written and very informative. Good to add links to the kit too.
Excellent article and looks a good set up.
However, I would just put a couple of points. From a legal point of view only certified food grade ingredients can be used for anyone looking to sell their beer. Secondly, though bacterial contamination risk might be very low check the connectors for any oil/ grease residue that can come from some filling/refilling points on industrial gases.
On the level of O2 itself metering is key, usually a Rotameter type in trade. Over oxygenated wort is really a danger for some yeast strains and secondly excessive production of biomass i.e. more yeast = less beer plus possible off flavours.
The theory calculation for say 10ppm of oxygen in 25 litres of wort is something like:
10ppm =10mg/ litre x 25 litres = 250mg = 0.25g of O2
1 mole of O2 = 32g
So we need:
0.25g/32g = 0.008moles of Oxygen x 22.4litres/mole = 0.175litres O2
(The 22.4 litres is 1 mole of gas at STP)
Solubility of oxygen is variable and as mentioned bubble size is key and temperature obviously.
Hope this helps.
Interesting Nigel….if I only need 0.175L of O2 to get to 10ppm then this doesn’t seem to be a lot, considering that most discussions seem to indicate that folks are Oxygenating at a rate of 1 – 1.5L per minute….for 2 minutes….so introducing 2-3L of O2…..so between 11 and 17 times the amount that you suggest.
I would guess that the introduction of O2 in an open unpressurised system is therefore not a 100% efficient process and a lot of O2 is “lost”. Is that the case? Or am I missing something else?
Exactly Nick. Sorry, I forgot to mention in the above that the effiency of the delivery system is also key.
I was only taught 2 systems: Venturi and 0.5micron stone. Interestingly I was also told never use a 0.2micron stone.
The efficiency is calculated:
Volume of gas delivered to wort / actual volume of gas ending up in wort.
The 0.5micron stone is about 25% efficient. So all given you may we’ll find you need 4 times the theoretical volume above.
To be honest unless you have a DO meter it’s all academic.
Sorry, just noticed typo in above answer to Nick. Should read ‘2.0 micron’
Hello, thank you for supplying this explanation, my query resonates the same comment as Nigel,
I am look for this system but to use food grade CO2, and also want to know do the regulators need to be a food grade or are general welding regulators suitable for use in beverage production ?
Hi Lorraine,
UK Food Law states that anything coming into contact with food must be food safe. The gas regulators themselves are identical in food and non-food applications.
Provided you purchase these and the CO2 gas from a brewing/food/cellar supplies retailer then you should be fine and have a due diligence defence in the event of any problem possibly arising/occurring in the end product.
Hope this helps.