Bergland Thermo Pot Mash Tun Build
Tired of using a picnic cooler as a mash tun? Why, they make a perfectly good mash tun. If you need more capacity there are numerous options available. This article is going to cover an overview to converting a Bergland 50-litre stainless steel thermo pot into a Mash Tun. There are processes, but as I’m NOT an engineer (or a very responsible adult) please do your own research and only take these jobs on if you feel capable.
It is much cheaper to DIY, but you’re ultimately responsible for what you create and let’s not forget the wort being created in the Tun is extremely hot and not something you want on you or your loved ones. That said, there is a lot of fun to be had, if you’re a touch sadistic. Stainless steel can be difficult to deal with. I spent hours drilling the holes in this pot – It’s probably worth paying the Malt Miller or Angel Homebrew to do it for you, but what’s to be learned from that!? Once you learn to use decent cobalt drill bits and go slowly with plenty of pressure, the whole job changes and gets a lot easier.
The cost aspect is important, but the learning curve is my main aim. This parts for this project cost less than £100 – there are other items, but they’ll be used for other projects, later, like the 50mm carbide hole saw and 21mm Q-Max hole cutter.
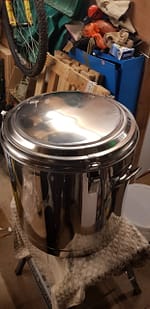
Thermo pots are by nature, thermally insulated and Bergland claim their pots easily retain the original temperature to within 1oC over a 90 minute mash. These pots have a twin-skin of stainless steel, sandwiching 20-25mm of high-density insulating foam. A pair of handles are welded in place and the lid is also insulated and has a rubber seal. The top is anchored in place by a fixed post with a slot in it and two snap-fit locking hinges.
Preparation, Parts & Other Bits
Before you begin, you’ll need to decide where you want to drain the wort from and how you’ll handle the filtering. You can use a filter matrix (copper or stainless piping with slots in) or a false bottom with a side-drain direct to bulkhead or socket and tap or bottom-side or bottom-centre drain hole using stainless yacht deck gland.
For this build, we’ll use a bottom-centre drain with a false bottom. The lis of parts:
- Bergland Thermo Pot
- 1/2″ Stainless through-hull yacht cable gland/deck drain
- 1/2″ Stainless 3-piece ball valve tap
- 1/2″ Stainless steel 90 degree elbow
- 1/2″ Stainless Steel barrel nipple or hose tails and tubing
Tools Required:
- Drill
- Cobalt drill bits pack of 5x 5mm
- 50mm Carbide tipped hole saw
- 21mm Q-Max holecutter
- Handheld disc cutter or Dremmel multi-tool
The Pot
The Bergland Thermo-Pot is rather large and weighs a fair bit (around 8kg) when empty, this obviously increases when loaded with grist and brewing water. How you’ll move or empty it is also worth considering.
The first thing to consider when drilling your stainless pots is making sure you get good quality Cobalt drill bits. An early understanding of if you go too hard and too fast at stainless, you’re fighting yourself will help you no end. If you want to make your life easier, go slow and apply plenty of pressure with loads of oil (or water) to lubricate and keep the drill cool and you’ll get the job done a hell of a lot quicker. If you get stainless too hot, it goes tensile and becomes even harder to drill!
Drilling
As previously stated, go slow, apply plenty of pressure and use lots of lubricant/cooling water with regular applications to try to keep the area cool and avoid the stainless going tensile. If I was doing this again, I’d buy some grinding/cutting paste, as this seems to be what the pro’s use.
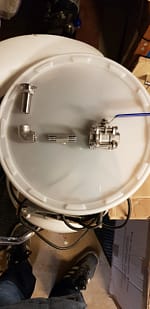
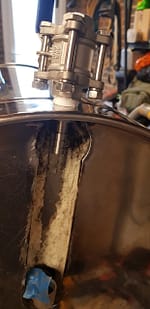
For this pot we’ll need to drill 4 holes and use a hand grinder to cut the channel out for the pipework from the centre drain to the 3-piece ball lock tap.
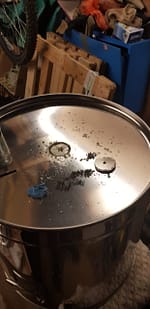


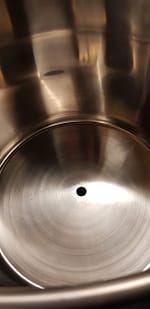
The first hole goes straight through the outside and inside skins (above) to make way for the centre drain and 90-degree elbow. The outside skin then got the 50mm hole saw on it to give some access to the inner skin. For the inner skin drain hole, I started with a 4mm pilot hole and worked up to 10mm to take the bolt of the Q-max hole cutter. This flew through the 1.5mm pot base skin. The third hole is to go in the edge at the mid-point of the pot (below). This hole will go between the two handles to maintain the pot’s symmetry, when it’s in use. This hole was made with a 4mm pilot hole, then straight to the hole 50mm cutter which went like a hot knife through butter.

The two hole edges create a line to run the grinder down and we’ll mark this out with tape and pen to use as guide. We’ll also need to clean the edges, removing any burr and make room for fitting the 3-piece ball lock tap.


Once the channel is cleared out, we’ll remove the foam and fit all the plumbing using PTFE tape to help avoid leakage from the threads. First, we’ll need to create the 10 mm hole for the 21 mm Q-Max hole cutter. Once this is prepared, the Q-Max rips through the 1 mm outer stainless skin. When the 21 mm hole is ready, it’s just a case of fitting the plumbing and doing everything to avoid any leaks.


Final Fittings
The final fittings on the underside of the pot will be lagged and insulated to help keep the temperature in the pot. The original hose-tail fittings were quickly swapped out for 1/2″ compression fittings and short 15mm copper tails. Simply because the copper tails create better seal than the 1/2″ hose tails. I couldn’t get the hose-tail to seal without a cable tie and I don’t want to have to take the hose off if the reduced hose-tail blocks for any reason. The tap is plenty able to choke the flow.

Last things last, we’ll fill the pot with water to leak test our handy work.
[Update] False Bottom
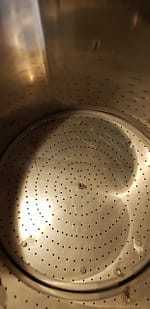
The original false bottom that I’d scavenged from another mash tun purchased on eBay wasnt quite right. It was about 2mm to short all round and the filter holes were 3mm, which is a little too large for the size crush I use. I was also having trouble with the husks slipping through the grain bed and more than likely down the sides of the beer line I used as a seal. The 3mm holes were letting grain and flour through so getting a clear wort was really difficult. I had an old BIAB bag I’d used a couple of times and left in a cupboard. That was employed as a primary filter and laid over the false bottom which helped to stop the finer particles getting through and causing cloudy wort. In the end, I decided to do things properly and bought a correctly sized false bottom at 393 mm with 2mm holes and a 32% open area. It came with a really sleek silicon seal and is bang on size.
Original False Bottom:
Intermediate False Bottom Fix (BIAB)

New False Bottom 393 mm diameter with 2mm holes giving a 32% open area.

Lesson Learned
So, what was learned from this project?
- The bottom drain and 90-degree elbow didn’t leave much room with the 50mm hole saw. Maybe go larger here and give yourself more room than I did or use different fittings. I’ve seen people grind out the bases to give themselves more room.
- I used 2x 21 mm washers, one either side of the side-wall, this gave the tap a more “solid” feel, it’s not the thickest of side wall material, it did appear a little flimsy.
- At first I used a length of hose and two hose tails. It appeared to do a job and even restricts the flow to avoid draining the mash tun too fast, but it wouldn’t quite seal with the platinum hose at one end, so I’ve now moved to a different, more permanent solution with a length of copper and 1/2″ BSP fittings.
- Cobalt Drills and Q-Max hole cutters are required.
- Use grinding/cutting paste to keep drill bits cool and go slowly with regular breaks. You should be able to fly through these pots with minimum effort. Hopefully.
Thanks for reading.
Nice write up Rich