Introduction
This project will handle creating a homemade CFC in as few steps as possible. You can learn from any mistakes here and create your own, better CFC or decide on an immersion chiller or plate chiller – think Blichmann Therminator™ (bright light in the sky and loud orchestral “ahhhhhh” music).
I enjoy the creative aspect of making beer and I also enjoy the challenge of making some of the kit that goes toward making beer. The challenge provides the opportunity to learn new skills and save a few (hundred) quid here and there.
First you need to buy the parts or scavenge the garage for any bits. I already had a bit of plumbing around the garage, some 15mm copper pipe, and T-pieces to make the cold-water interface that jackets the 10mm copper where the wort flows. The full list of parts is listed below.
I use a combination of compression and solder joins to make it easier to pull the bits apart for cleaning or so I can at least do this if I need to.
Parts list:
- 10-metres of 10mm Microbore copper pipe
- 10-metres of 5/8 clear braided hose
- 4x 15mm to 10mm compression fitting
- 2x 15mm solder T-Pieces or 3-way 15mm compression T-Piece
- 2x 15mm to 15mm compression fittings
- Heavy duty cable ties
- 15mm copper pipe
Optional parts to help with temperature control you can choose to go the T-piece route or use a Grainfather Wortometer: a neat and simple solution I found after making this arrangement \○/.
T-Piece parts:
- ½” BSP Stainless steel T-piece
- ½” BSP Thermo well
- ½” BSP hose connector (I use cam-locks)
- Thermometer (digital or analogue)
- A neat inline thermowell you fit to the wort out hose
Process
Create the Wort Pipe and Water Jacket
- First up, you need to unroll the hose and lie it out with something sturdy to hold it, as it’ll want to keep rolling back up.
- With the copper pipe, you’ll want to unroll this and straighten it carefully.
- Feed the 10mm copper pipe through the 5/8 hose pipe.
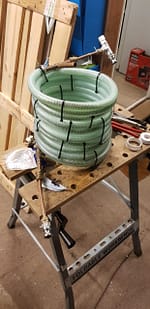
- Once you have it through and even at both ends, grab a spare corny keg or similar and roll this bad boy up into a classic CFC coil.
- Make a tight coil as neat as you can manage.
- Use the cable ties to secure the coil and keep it all neat (you can use wire if you like).
This is the main coil and wort tube created. This is the bulk of the work, the rest is pretty simple (but time consuming).
Sealing the Water Jacket
To seal the cold-water jacket, you need to create the T-piece. How you do this is entirely up to you. You can solder the junctions or use a compression T-piece.
The below image is the first version of the homemade CFC this simply uses the 15mm to 10mm reducer as a point to fix the exit wort hose to a hose tail and to the exit hose. This is now connected to a stainless steel T-piece with a thermo well and Cam-lock hose disconnect.
I’m not going to tell you how to solder here, Google is your friend. To solder, you will need lead-free solder, a blow torch and some plumbers flux.
To seal the water jacket you need to:
- Cut 6x lengths of copper around 14 cm each (you decide how long you want each piece here, there’s no science to it AFAIK).
- Now you’ll either solder the junctions in place or use compression fittings to create the T.
- Place the long side of the T-piece over the 10mm copper and push one end under the hose enough so it’ll be held secure – around 2-inches is enough.
- Hold it all in place with a suitable jubilee clip.
NOTE: It’s advisable to occasionally check this junction for movement and potential leaks. Particularly if you have an electric brewery. - On the outer loose ends of the 15mm T-pieces: attach the 15mm to 10 mm compression fittings (or solder in place).
- Slide the 15mm collar and olive on first (in order) and offer the reducer up to the 15mm pipe and tighten to create a water-tight seal.
- Slide the 10mm olive and collar on and tighten it all down to create a water-tight seal to keep the cooling water in the cooling jacket.
- To allow you to attach your hose fittings of choice to the wort pipe, i.e. ½” Cam-lock fittings, attach the other two 15mm to 10mm reducers to the ends of the 10mm copper wort pipe.
- Slide the 10mm collar and olive on the pipe and offer the reducer up to the pipe and tighten to create a water-tight seal.
The final T-piece arrangement should look something like this (or even neater).

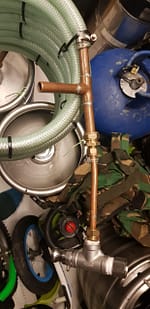
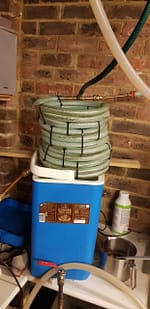
The final assembly is easy to use and can take your wort down to pitching temperature in a single pass with the right amount of cooling water. To help monitor the wort temperature, the T-piece on the wort-out end houses a thermometer. I use a digital probe that fits in the thermo well and it works well enough. I’m slowly moving to better solution but the current set up “does a job”.
Immersion Chiller
If you don’t want to make the CFC you can always opt for an immersion chiller (IC). You can easily make one using the steps above. Just skip adding the cooling jacket and roll the 10mm copper without it (no need for the cable ties either). Attaching a compression 15mm to 10mm reducer for the hose in and out line allows you to attach hose connectors. The 15mm BSP end fits direct to 1/2″ BSP female cam-locks or quick disconnects (even Hozelock) for for the cooling water.
You can use 15mm copper pipe, but it’s a very different proposition requiring you to crimp the copper and fill it with fine sand or salt to avoid kinking it. There are other ways of creating CFCs and ICs too. Google is full of awesome ideas.
Cheers.
2 thoughts on “Making A Counter Flow Chiller (CFC) to Help Rapidly Cool Wort”