Introduction
This article is a work in progress. It will probably change a bit over time as more is learned. I’m hoping to add good/bad ideas as they’re discovered and the entrepreneurial process is fine-tuned and turned in to a repeatable process – with similar, repeatable results.
I’ll touch on what Short and Shoddy (S&S) brewing is and the how it’s different compared to the standard 1 hour (or longer) mash and boil. If you already know what Short and Shoddy is and want to skip the next section, go ahead click here to jump to the brew day).
Traditional Brewing Overview
Mash
Traditionally, brewers used the 1 hour rest to mash in and get full conversion of the malts. We still do this today, but do we need to?
Before we had access to modern science-backed growing and development coupled with with improved malting techniques, traditional malts were not as well modified as the malts we use today. Modern malts have much higher levels of modification and enzymes present through selective breeding and improved malting. Even as home brewers, we can now access the same raw materials as professional brewers (maybe our hops aren’t quite as fresh). As far as a short mash and modern malts are concerned, my (short and shoddy) research for a shorter brew day showed that most (a lot of modern) malts are capable of converting the sugars/starches very quickly (some in as little 5 mins at higher temperatures 70-72C).
Mostly we are used to working at temperatures around the 66-68C mark for good fermentability coupled with a moderate body, from a mix of fermentable sugars. So around 20 minutes should be enough time to get a satisfactory conversion, right?.
From more reading, there is seemingly a temperature/time coefficient and not all malts/beers are the same. So without being too technical (othewise known as out of my ball park) basically the higher the mash temps the shorter, time-wise, the mash potential is. The opposite is the case with lower temperatures, but you’ll end up with a drier beer and less conversion, with a hit on the overall efficiency from a lower conversion rate.
Boil
A main traditional requirements for a 1 hour boil was to drive off the compound DMS. This isn’t really an issue in the majority of modern, well modified malts either. That said, some less-well modified super pale, lager malts will still exhibit levels of DMS and they are seen as acceptable at low levels (or even required for flavour in some American pale lagers). A shorter boil could, potentially, recipe dependant, exaggerate DMS to undesirable levels. Always make sure you do your own checks for any malts you use, before you brew your own S&S beers. My understanding is this shouldn’t be an issue unless your shooting for super pale or lagers.
Beer Style Limitations
As highlighted, there are obviously limitations for the style of beer you can make with an abbreviated 30 minute mash and boil. However, if like me, your time is short, give it a go and see what you can make.
My Aim
For my purposes, I’m looking to brew a good standard of beer in a single evening after a day at work. Time is tight and I still want to brew myself decent beer to enjoy of an evening. I also aim to share some with friends and fellow brewers for feedback purposes to help improve the process.
So What Is Short & Shoddy?
Well done, you got this far – Short and Shoddy simply means shorter mash (but you should still get full conversion) and shorter boil. A shorter brew day might suit some people more than others. This isn’t a traditional method, as you should have gathered by now. Again, if you’ve ever spoke or know me, I’m quite time-poor and find my window to brew is fairly tight right now, and positioned squarely in the in the evening.
I’d read about this method (short and shoddy) and that it makes comparable beer in a reduced timeframe. You do need to tweak your recipes and allow for a shorter boil with more bittering hops and maybe more malt. This is due to the lower water volumes required due to the shorter boil with less isomerisation during boil off. Your extraction and overall efficiency may also suffer with less available sparge water and time to convert starch to sugar and to wash all those available sugars out.
In summary, I’ve struggled to find time to brew recently, so wanted to try this method for myself to draw my own conclusions.
Brew Day
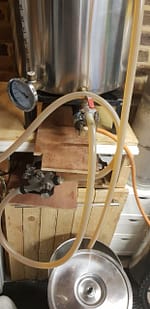
Set up
To start my first S&S brew, I spent some time beforehand working out total water required/modifications and bittering hop additions. These changes to my usual 1 hour Mash and Boil process is all based against a known “good” recipe, one that I’ve brewed many times and had good results with.
For this recipe, I’d use my 11C “Strong Bitter” recipe, which is a favourite drinker of mine with decent feedback from others. It usually comes out around 5.1%. I was intrigued to find out what my overall and extraction efficiency hit would be, so I left the malt bill alone, aiming for 20-litres of a 4.1%+ Best Bitter (11B).
Recipe
The Recipe was:
Malt:
- 84% Maris Otter
- 10% Munich (floor malted),
- 1.5% Crystal 50
- 3% CaraMalt
- 1.5% Black Malt.
Boil additions hops/adjuncts:
- 29 IBUs of Target hops for 30 mins
- 5 IBU EKG at 5 mins
- 0.5 Protofloc also at 5 mins.
Water was 50/50 Colchester tap with Spotless Water RO. Salt additions were calculated at 2g Gypsum 1g Cal Chloride to give a balanced water profile of 74 ppm Calcium, 75ppm Chloride and 74ppm Sulphate. This aims to give a balanced water profile. This water and malt bill provide a good malt balance and allows the assertive bittering hops to shine, as it should in a bitter.
Hop additions were changed to suit the shorter boil and lower isomerisation, for this beer I used Target, as it’s a fairly high AA hop, it’s reliable and I like it for bittering. I chose EKG for later addition, after all, it’s a British bitter, and East Kent Goldings are synonymous with the style and again, I like them.
I poured the 15l of tap water to the kettle in the afternoon before deciding to brew and added 15l of RO with the salts and 0.5 a campden tablet to neutralise any chlorine (usually do this the night before to give any chlorine time to flash off without the campden tablet). I also calculated I needed 5ml of lactic acid to help with predicted pH, which was spot on.
The Brew
Mashing
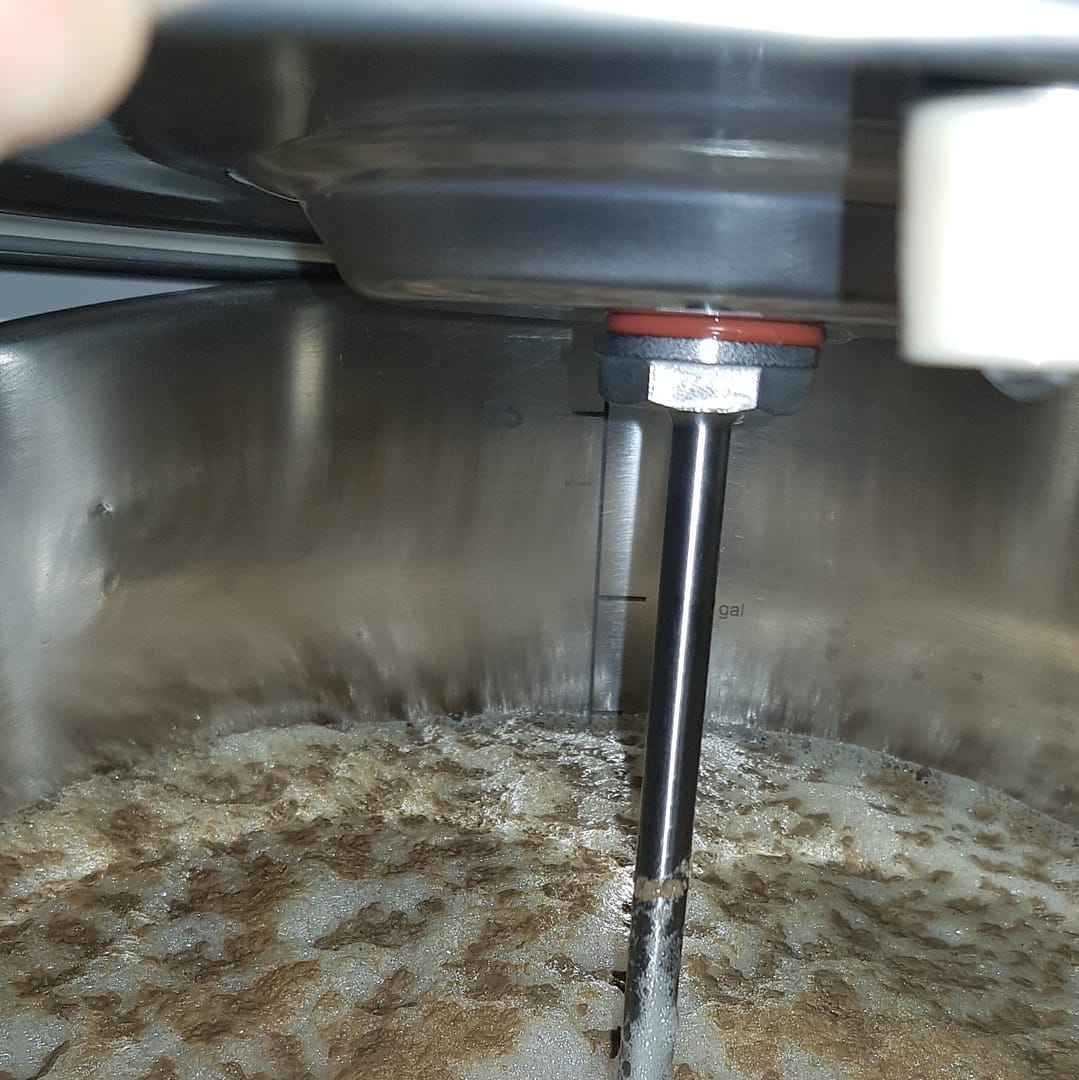
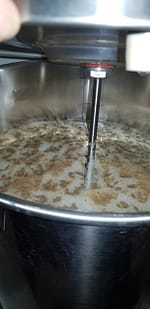
The water was heated to the pre-calculated strike temp of 75C for 67C mash in. A portion of water was used to pre-heat the MLT, while the grains were weighed. My MLT is still new to me and I’ve struggled to hit mash temps on 3 previous attempts, even with pre-heating. I made do with 64C after needing to use more strike water than I wanted to help get close and creep the temp up – no time to boil water once you’ve mashed in with a 30 mins limit ticking (and you want to go to bed before midnight) This left me with a thinner mash and less sparge water than I wanted.
With the lid latched down and pre-heated, my Bergland Thermo Pot is good for holding the temperature for the 30 minutes, and didn’t drop any perceivable heat. 64C is just about hot enough to gelatinise the starches for the enzymes to chomp through to convert to fermentable sugars. Not ideal and not what I was aiming for.
I’ve got a new RIMs set up ordered to take care of mash temperatures, when it finally arrives.
Note: Even though the iodine test was negative, indicating that conversion was complete, I’m not convinced that the full diastatic potential was extracted from the grains at this temperature. My brewhouse efficiency ended up at 65%. Was this down to the mash temperature or the reduced sparge water?
[Further reading after this brew day showed me that lower mash temps need longer to convert, so a higher mash temperature is required. For quicker conversion, shoot for min 68C or higher (max 72C) to geletanise the malts starches to let those enzymes get to work.]
After mash in, the 30-minute clock was started and the pH taken after 10 mins, hitting the predicted pH of 5.3. The clamps on the lid were secured and left for the rest of the 30 minutes, after a brief, final stir to check for any dough balls. At 30 mins I set the pump slowly recirculating and setting the bed for sparge and running to the kettle. While the grain bed was setting, I completed a quick iodine/starch test to make sure conversion was complete. This showed me conversion was indeed complete (or was it- probably not) and in this case, a 30 min mash was enough time to complete conversion. Time for a loaded question without a definitive answer: So, why do we need to spend the extra time?
[More to come on the subject of the iodine test and conversion].
The wort was transferred to the kettle, and the remaining sparge water was gently sprinkled over the grain bed to wash out as much of the residual sugars as possible. As soon as the MLT was empty, I took it out to empty and rinse everything out, while the beer was coming to the boil. I usually start the 8kW burner at the 3-gallon mark and continue to run, in this case, 5.2 gallons or 23l of wort to the kettle for the 30 min boil.
Total Mash and Transfer time ~50 mins.
The Boil
Once the hot break formed and a steady rolling boil was evident – after roughly 15 mins – I stirred the hot break back in (personal preference) and added the first hop charge of Target and stirred it in.
15-mins into the boil, I hooked up my homemade CFC to run boiling wort through to sterilise it for 5 mins. I routinely discard the first 300-500ml of wort that passes through the CFC, some of what comes out to start with has been sat in the pipes since the last use. As this process takes some heat out of the boil, I’ll pause the boil clock and wait for it to come back up to a rolling boil before restarting the timer.
The 5-min hop charge with 0.5 protofloc were added, stirred in and left until the boil clock was complete.
Total time ~45 mins (including stops).
Chilling the Wort
I ran the CFC with cold feed on fast and kept tweaking the riptide tap to choke what was going through the CFC to maximise the cold waters interaction on a fairly slow flow of wort. The digital thermometer showed a steady decline and the wort was ready to run to the FV at 17C, always keeping an eye on the volume and clarity of what is being drawn and the wort chiller interaction with temperature changes. I’ll make changes to suit, aiming to get around 17C total. The dry S04 yeast was pitched once he FV had a few litres in it and the chilled wort was splashed all over it to incorporate it as best I could manage.
Total Time ~25 mins.

Short and Shoddy Brew Day Conclusion & Times
Total brew time minus kettle clean up 2 hours, with clean up and bits of messing around and having to stop for various reasons, this brew took around 3 hours. This is a very manageable time period for an evening brew session (for me). 3 hours means I can have the water timed to be ready for an 18:45 mash in, I can start the mash, do the family routine at 7pm and get back to test and run the wort to the kettle and have a beer in the chamber by 10pm leaving the kettle to CIP and a bit of light scrubbing or leave it for an overnight soak.
Fermentation
Kick Off
After 18-hours the S04 yeast has kicked in, the temperature is naturally ramping from active fermentation up from 17C toward the set 18C on the Inkbird the Krausen is evident. The airlock is gurgling away, with bubbles of starsan pouring out.
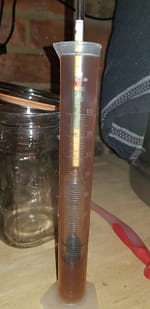
Fermentation appeared to be complete after 6 days with the hydrometer reading the predicted 1.010 (from 1.041 – 4.1%). The beer appeared a nice, clear, chestnut brown with a sweet, nutty aroma and sweet, nutty flavour. Concerned the sweet flavour may be diacetyl, I roused the yeast and ramped the temp up to 20C for a couple of days to fully attenuate (if there’s anything left to ferment…)
The final beer will be shared with members at a meeting at random and will be mixed with another bitter of the same recipe made with a standard process for comparison, without the knowledge of which-is-which, in a mini-xBmts kind of thing.
Conclusions to follow…
- DMS is a sulphur compound typically considered an off-flavor in beer. It is unpleasant at high concentrations. It’s introduced into beer during the boil from the thermal decomposition of S-methylmethionine (SMM) which is produced in the embryo of barley during germination.
- Diacetyl is an intense buttery compound that is found in beer with a butter scotch flavour and slick mouthfeel on the roof of your mouth and back of your throat/tongue. Factors that influence the diacetyl level in beer are fermentation temperature, aeration level, bacterial contamination, and the yeast strain. Diacetyl is produced in the early stages of alcohol production by the yeast and as the yeast prefer it, they eat the freely available sugars before they move on to the diacetyl, once all the sugar is consumed.
Excellent that you are doing a proper sample test with group. Personally I think it is fine with dark beers but i never tried it with anything like a bitter so it find this interesting. As you fellas know, mine is GF set up and I wash as going along . I will time mine next 60 60 brew on timer and write down step time same as you have and see how that compares.