
The Conicus Pro Unitank – A “Tower of Power” in the Home Brewery
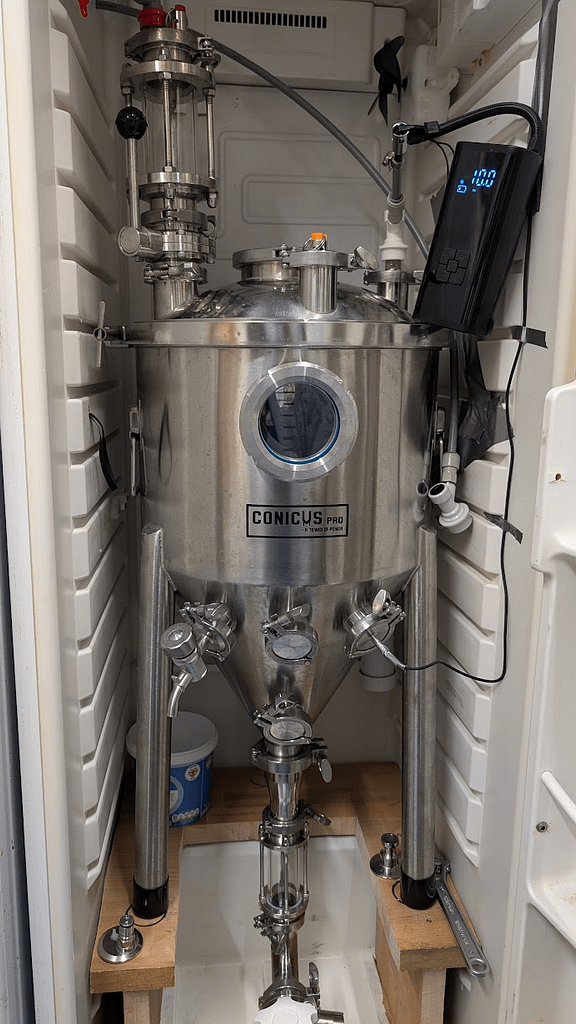
Four batches in and I’ve converted from basic fermentation to a fully integrated unitank system. The Conicus Pro (by Brewolution) is a professional-grade AISI 304 stainless steel vessel designed for a “single-vessel” workflow—from pitching yeast to serving carbonated beer.
Here is a breakdown of how it works, how I’ve configured it, and the lessons learned to help you decide if it’s the right upgrade for your brewery.
1. The Core Setup: Dimensions & Cooling
The Conicus Pro is a substantial piece of equipment, but its height is a primary constraint.
The Fridge Swap:
I initially planned to use an existing 1.3m tall fermentation fridge. However, due to the unitank’s height—exacerbated by the top-mounted fittings—I had to convert my taller serving fridge (~1.5m).
The platform at the base allows for various outlet arrangements.
Temperature Control:
An Inkbird controller manages a tube heater. I recently upgraded from a heat belt to the tube heater; while it raises temperatures slowly, it should provide stable, incremental control.

2. Advanced Configuration: Custom Modifications
The standard unitank is a versatile base, but the Tri-Clamp (TC) system allows for bespoke customisation. To optimise this unit, I added several upgrades:
Sight Glasses:
I integrated 1.5″ and 2″ sight glasses. These are essential for dry hopping and ensuring you are only dumping trub, not finished beer.
The Valve Upgrade:
On the tank outlet, I utilise either 2″ or 1.5″ sight glass with butterfly valve, complemented by a diaphragm valve. This is a game-changer; it allows for precise yeast dumping and prevents air (or CO2) from bubbling back through the beer.
The Racking Arm:
As the commercial arm was too large for my specific setup, I constructed a bespoke racking arm to ensure I pull only the clearest beer.

3. Fermenting Under Pressure
The Conicus Pro is rated for a maximum of 15 psi. I ferment and carbonate lagers >13psi, while my American Brown Ale is currently held at approximately 7psi.
Closed System:
Using a spunding valve (the orange/red regulator) allows me to naturally carbonate using the CO2 produced by the yeast.
Oxygen-Free:
The sealed system allows for bottling and kegging under pressure, which has completely eliminated diacetyl issues.
Tip: I found my beer was initially slightly under-carbonated, so I’ve added a carbonation stone to the setup in an attempt to reach that perfect “brite beer” level faster.


4. Monitoring & Visibility
The built-in round sight glass is excellent for checking the krausen, but it only becomes functional once the batch size exceeds 23 Litres. A sight glass attached to the bottom outlet also works to monitor progress.
Visibility Hack:
Stainless steel interiors are dark. I recommend using a torch to inspect the fermentation activity through the glass.


5. Cleaning & Sterilisation (CIP & SIP)
Clean in Place (CIP):
Cleaning a unitank is effortless with a dedicated system. My setup uses a variable speed pump attached to the bottom outlet.
A silicone hose runs from the pump to a camlock on the top of the tank.
A Low Volume CIP Spinning Spray Ball attached to a 4″ CIP lid creates a high-pressure cleaning cycle.
I still open the 4″ port to wipe down the krausen line and check for debris. Every port is wiped out during dismantling.
Steam in Place (SIP):
I sterilise using a wallpaper steamer connected to the tank. I close the ports to create minor pressure and monitor the Inkbird high-temperature alarm as it passes 100°C. Note: Steam under pressure is hazardous; exercise extreme caution.

6. The Verdict: Pros & Minor Annoyances
The Pros
Quality & Control: Zero oxygen ingress ensures significantly fresher beer.
Yeast Harvesting: The bottom dump is effective when paired with the diaphragm valve.
Modularity: The TC system allows the fermenter to grow with your hobby.
The Annoyances
Sealing: Do not rely solely on the factory gaskets. The lid, 4″ TC, and sight glass gaskets all require a thin application of food-grade silicone sealant to remain 100% airtight under pressure.
Preparation: I always pressure test the tank to 10–15 psi the day before brewing. If it holds overnight, it is ready for the steam cycle.
Final Thoughts
If you are looking to step up from plastic and want the ability to ferment, crash, and carbonate in one go, the Conicus Pro is a “Tower of Power” indeed. It requires some fine-tuning and a few extra gaskets, but the results in the glass—clean, crisp, and oxygen-free—are worth the effort.
Find out more: https://www.geterbrewed.com/equipment/fermentation-equipment/conicus-pro