Author – Ashley Carr
Introduction
The information obtained is from various sources, so this article is a distillation of ideas and techniques.
The outlined techniques are tried and tested and have achieved me remarkably successful outcomes. It goes without saying, that success is predicated on very high aseptic techniques. The very highest standards are beyond the cost benefits of a home brewer, but it is possible to deploy similar techniques successfully on a budget.
In my last presentation I introduced some of the equipment I used and gave current source links to where you can find them (see separate download), so please read this in conjunction with that to provide what I hope is a complete overview of what can be a complex subject ,but which in fact is relatively easy to get started in. It may provide you with another level of control and interest in this fascinating hobby. It may also save a lot of money.
Overview
My intention is to:
a: take you through how to make plates and slants’
b: show how to plate yeast in order to isolate a healthy colony and;
c: show how you can to make slants to culture up enough yeast to ferment a full batch of beer (23-25l)
Growing yeast from a plate (petri dish) allows you, as a brewer, to select only a few single cell growth colonies. By doing so a pure culture can be obtained even if the starting culture was questionable; the dregs from a commercial beer bottle for example. But because the number of yeast cells is very small during the first few steps, a sterile not sanitised environment is essential.
The same procedure can also be used to propagate yeast stored on a slant. Instead of picking a colony from a plate, simply introduce some wort cooled to the same temperature as the slant to release yeast from the slant and use that to inoculate the 2nd stage starter volume. Let’s start with making plates for culturing.
Equipment & Materials
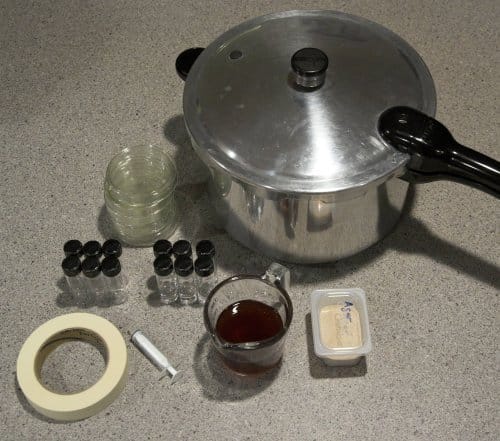
Yeast culturing at home does not actually require a lot of specialised equipment. Here is a list of what is needed, see also my previous paper in the Downloads section of our website for some other useful items:
Hardware
Pressure cooker
When working with very small amounts of yeasts sanitation will not be sufficient anymore. Sterilisation, which means complete elimination of all living organisms, including their spores, is needed. But this cannot be done by chemical means or boiling at atmospheric pressure. Microbiology labs are using autoclaves to sterilize their vessels, tools and media. An autoclave uses pressurized steam to achieve temperatures high enough for sterilisation. Though most home brewers do not have access to autoclaves, the function of an autoclave can easily be achieved with a pressure cooker. Not only is a pressure cooker much cheaper than an autoclave, it also has its uses in the kitchen and can be used to bottle/jar starter wort.
When buying a pressure cooker, look for a model that works at at least 15 psi. This will produce a temperature high enough for sterilisation. In order to take a 2 litre flask (22 quart 20.8l) I had to order one from the States, should be able to purchase one for a delivered cost of circa £150. Look on USA eBay. Unfortunately not an inexpensive item.
Vials
Vials are needed for making slant cultures. Look for ones that are autoclavable. There are various shapes available. Polypropylene vials are great for slants and small volumes of culture wort and can be pressure cooked for sterility. Another great advantage to slant tubes with a flat bottom is that they can stand on their own.
Petri dishes
If you want to work with single cell cultures or purify a yeast culture, you will need Petri dishes. Get the glass ones, which can be cleaned and reused, single use pre sterilised plastic ones are also easily available and very cheap.
Kilner type jars
Glass food jars can be used to hold agar cultures or small amounts of starter wort.
Syringe
A small oral syringe (10 ml) works great for measuring the amount of media that is added to the vials and plates. If you don’t have small children and get them when you buy medicine, ask for them at the pharmacy, again eBay is another useful source.
Tape
I use PTFE or masking tape to hold the Petri dishes closed after they have been sterilised and cooled. I also use the PTFE or tape to give the vials an additional seal; I also use a small strip of masking tape on the side of the vial to make notes on.
Medium
Wort
You’ll need about 100 – 150ml of 8 – 10 Plato wort (1.032 – 1.040 SG). You can use left-over wort from a batch of beer but Chris White of White Labs fame questions the role of hops, 12 IBU plus confers some antimicrobial protection, but isomerised alpha acid negatively affects yeast viability, as he points out if you need hops to keep bugs at bay your aseptic technique is the problem. You can make wort with malt extract, I like light dried malt extract (DME) and store it in bulk in a snap lock plastic box and keep in the fridge. I recommend this type of storage as DME is very hydroscopic. Make it up at a ratio of 10:1 with tap water, or distilled for the really paranoid, with a tiny pinch of yeast nutrient! A gentle boil for 10-15 minutes is usually sufficient just be careful you make enough to end up with your starter length. Watch it like a Hawk, boils over easily.
Agar
Agar is used to solidify the wort. It is possible to buy a DME and Agar powder already mixed but it is simple enough to buy them separately from eBay or a home brew shop.
Making Small Starter Volumes
When stepping up from a slant or plate, just using boiled wort for the initial steps isn’t sanitary enough. Because of that I also fill a few of the slants with 10 ml of wort and sterilize them in the pressure cooker, always ensure the lid is loose, a quarter of a turn is enough. This starter is then either dumped onto a slant or inoculated with yeast from a plate or slant.
Making Slants

For slants and plates agar media is needed. I use about 3-4 % agar by weight: However, I would urge you to do some experiments with various ratios to find one you like.
- 100 ml wort
- 3-4 g agar
Mix this in a heat proof vessel and heat (stove or microwave) to dissolve the agar. You will notice that it gets thicker. There is no danger in boiling it, but boiling is not necessary at this point. Use the syringe to measure 5-10 ml of agar into each vial. You need to have enough in the vial so that when it is on the slant it covers the whole of the side and bottom of the vial.
Making Plates

Squirt 10 ml of the agar media into each petri dish. You are looking to get enough onto the plate so it isn’t so thin that it dries out quickly. A refrigerator is quite a desiccating environment
If you are interested in growing other microbes than yeast on plates or want to use plates for sanitation tests you can also make a glucose agar media which is not as selective as the lower pH wort agar media. Be prepared to scare yourself silly!
Glucose based media:
- 100 ml water
- 5 g glucose (corn sugar)
- pinch of yeast nutrient and/or Diammonium Phosphate
- 3g agar
Sterilising

Before you load the pressure cooker you need to add some water. There needs to be enough water to last through the 15 – 20 min sterilisation process, I find 1 litre is sufficient, but not so much that it comes up the sides of the Petri dishes. This may require that you elevate the supporting false bottom that comes with the pressure cooker. I can simply insert mine upside-down, which raises it further away from the bottom.
Place the plates and vials on that false bottom (caution: the plastic plates are often unable to stand this, typically they are supplied pre sterilised). The vials shown can actually stand on their own and will not tip over during the sterilisation but I put mine in a casserole dish that ensures they stay bunched and upright. Once all items that need to be sterilised have been added, place it on the stove and add the lid. But do not close the pressure relieve valve yet.
Turn on the heat and wait for steam to develop and blow out. Letting some steam blow-out first will replace the air inside with steam, which does a much better job with sterilizing. Now close the pressure relieve valve and wait until pressure builds up. Read the instructions that came with the pressure cooker as the procedure is the same as if you would pressure can items.
The pressure has been reached when steam is blown off by the pressure relieve valve. Now wait 15 – 20 min until you turn off the heat or remove it from the burner.
Let the cooker cool down on its own and do not try to speed things up by venting steam or placing it into a cool water bath otherwise the media inside the vials may release steam to quickly and causing the vials to spill or burst.
Cooling

Once the cooker has cooled enough for the pressure to be gone, open it. Tighten the caps on all the vials and let them cool on the counter. Don’t worry about the condensation on the petri dishes. Just seal them with masking tape once they are cooled without opening them first. Opening them to shake off the moisture risks contamination and the moisture will be absorbed by the slant media during storage.
To make slants I lay the vial onto a chop stick such that the media stops shortly before the top of the vial. This gives me a nice large surface area later. Once cooled I seal the top of the vials with PTFE or masking tape and use masking tape on the side so I can write on them what and when happens to them. This way I don’t have to worry about any contaminants getting under the cap.
Storage

You can store the slants and plates anywhere. Since they have been sterilized, they should not spoil. However, I put them in the fridge, to prevent drying-out of the slants I keep them in a large zip-top bag.
How to streak a plate/petri dish
a Loosen the cap of the bottle containing the yeast.
b Hold an inoculation loop in your right hand.
c Flame the loop and allow it to cool.
d Lift the bottle/ test tube containing the yeast with your left hand.
e Remove the cap/ cotton wool plug of the bottle/ test tube with the little finger of your right hand.
f Flame the neck of the bottle/ test tube.
g Insert the loop into the culture broth and withdraw. At all times hold the loop as still as possible.
h Flame the neck of the bottle/ test tube again.
i Replace the cap/ cotton wool plug of the bottle/ test tube using the little finger of your right hand. Place the bottle/ test tube on the bench (or in a rack).
j Partially lift the lid of the Petri dish containing the solid medium.
k Hold the charged loop parallel to the surface of the agar. Smear the yeast backwards and forwards across a small area of the medium (see streaked area ‘A’ in the photograph).
l Remove the loop and close the Petri dish.
m Flame the loop again and allow it to cool or place on unstreaked surface of agar.
n Turn the dish through 90° anticlockwise.
o With the cooled loop, streak the plate from area ‘A’ across the surface of the agar in three or four parallel lines (area ‘B’). Make sure that a small amount of the culture is carried over.

p Remove the loop and close the Petri dish.
q Flame the loop again and allow it to cool. Turn the dish through 90° anticlockwise again and streak from ‘B’ across the surface of the agar in three or four parallel lines (area ‘C’).
r Remove the loop and close the Petri dish.
s Flame the loop again and allow to cool. Turn the dish through 90° anticlockwise and streak the loop across the surface of the agar from ‘C’ into the centre of the plate ‘D’.
t Remove the loop and close the Petri dish. Flame the loop again.
u Tape the plate closed and incubate the plate in an inverted position.
Making a starter from a plate or slant
Before you start

Make sure that there is no draught or other air movement in your working area. This could blow contaminants into your cultures. I use a Dental spirit lamp to provide an up draught but for brewers with more money than sense a laminar flow hood is the ultimate luxury. Loosen the cap of the vial, tube or 250 ml flask containing the 1st stage starter wort. This should pull in some air. Tighten the cap again and give it a shake to dissolve some of the oxygen, if using a flask some sanitised foil covering the opening will suffice. Since sterility is most important at this stage do not oxygenate the wort with other means that could spoil it. The yeast will grow even without lots of O2.
Undo the tape that keeps the petri dish closed, but keep the lid on.
Using the flame source sterilize the inoculation loop by starting from its end and pulling it slowly through the flame. All parts of the loop that may come in contact with the vial, wort or culture should be flamed but it isn’t necessary to have it glowing red. After that open the vial and stick the loop into the wort to cool it off. Otherwise you are going to fry the colonies that you are going to pick next.
Picking Colonies
In order to ensure that you are only using yeast colonies that have grown from a single yeast cell only consider single round colonies of yeast (see picture below). Yeast colonies are off-white with a round dull looking surface. Some of your streaks on the plate should have produced such colonies.
Repeat this until you have picked a few colonies. You could also pick only one. This would give you a pitch of yeast grown from a single cell. But I like to mix it up with a few colonies.
Close the plate and the vial. If you look at the bottom of the vial, you can see the colonies.
You can also grow yeast from a slant. But since there are no distinct colonies on a slant you simply pick up some of the yeast “lawn” with an inoculation loop and transfer that into the 2nd step medium. The rest of the propagation process is identical. This saves the step of streaking yeast on a plate when I can trust the purity and viability of the culture on the slant.

1st stage propagation
Place the vial in a warm location (18-25 C / 70-80F) for 2 days. During that time you want to keep the cap on only loosely to let the CO2 escape. Not only are you risking a sudden foam-up when opening the vial by keeping the cap closed tightly, but also are you retarding the yeast growth. Like alcohol, CO2 is toxic to yeast and the yeast prefers the level of CO2 to be low.
After a day or two you should see a small krausen and some yeast sediment developing. When you shake up the vial (don’t forget to close it and re-open it slowly) it will be milkier than before. This is a sign that yeast is growing. If not, make sure it is warm enough and give it a few more days. If after longer waiting nothing is happening, the yeast was dead.
 |
2nd Stage Propagation

Once there is some yeast sediment in the vial and the sample looks cloudy when shaken up, it’s time to step it up again. For the 2nd stage I’m still using sterile wort. But this time a larger amount that has been canned in a Kilner or baby food jar. Crack the seal and let some air in. Close it again and shake it up to dissolve some oxygen. Also shake up the vial, open it and flame its opening before dumping it into the 2nd stage wort, a really good device for flaming openings and anything else that wort or yeast comes into contact with is a kitchen blow torch used to caramelise food. Let this ferment for another 2 days in a warm spot; until I got a heated stir plate I used my brew fridge.
3rd Stage Propagation

Once the 2nd stage shows a krausen and an increased amount of sediment it’s time to move onto ~400 ml of starter size. To prepare this stage I add some water, stir bar and a pinch of yeast nutrient to a borosilicate 500 ml Erlenmeyer flask. Cap with aluminium foil and boil on the stove. After 10 min of boiling I let it cool down and add pre sterilised canned wort or use DME as the simpler alternative.
You want the final wort gravity to be between 8 and 10 *P (1.032 and 1.040 SG). At this gravity the yeast will have enough fermentables while not being stressed. Since the yeast population is large enough to fend off small contaminations, it is now safe to oxygenate the wort with an oxygen system.
To pitch the yeast into the starter, open the 2nd stage vessel, wipe down its rim with an alcohol wipe or use a flame (careful if you have both around!) and pour a small sample into a glass. Close the 2nd stage vessel again and sample the bit you put into the glass, a sniff is usually enough to tell. If it doesn’t smell or taste nasty and/or overly sour your yeast culture is still pure and you are fine to keep propagating it. Rouse the sediment and pour the rest into the Erlenmeyer flask and cap with a sanitised piece aluminium foil.
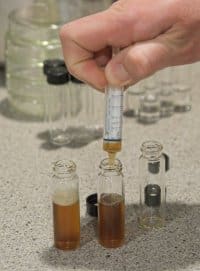
Place the flask on a stir plate. This and subsequent propagation stages can be done at room temperature or slightly above (18-24 c) fermentation temperature. If I have time I choose fermentation temperature as this gives the yeast the ability to get used to working at lower temperatures and there won’t be a shock when the yeast is pitched. But room temperature works fine too. Let it go until you see the starter getting cloudy (note colour change in right hand picture) and develop a Krausen.
|
 
|
4th Stage Propagation
Once the 400ml starter is sufficiently cloudy it can be pitched into 1600ml starter to make 2l. Aerate well and put it back on the stir plate and aerate continuously till fermented out or at high krausen. With a starter of that size, the stir plate doesn’t do a very good job of aerating it. After a few days (faster when done at room temperature +) it will be done fermenting. Now let the yeast settle out (refrigerate for best results) and decant the starter beer. Make sure yeast is at fermentation temp before pitching into your batch. If more yeast is desired add fresh wort, aerate and continue stirring.
Making Slants from a Petri Dish Colony
Hopefully, if you have read this far, you will know where I’m going with this. This stage is really a combination of what has gone before. Take your plate and read the section on picking colonies. This time instead of inoculating wort you streak a cell colony or two/three onto the surface of your previously prepared slants. Once you have done this and remembering to keep the lid on but not tightened, incubate at room temp (20-24 c) until you can see the colonies starting to grow. Once you have a fairly thick “carpet” of yeast growing on the surface check that there is a consistency to it and that no mould or discoloured colonies are growing as well, if so, obviously discard. I like to make several at a time to ensure success. Once you are happy with the growth, tighten the lid tape the cap and mark the “label” with date and yeast type. I’ve found they last quite easily for 6 months, stored in a domestic fridge. If I’m keen on keeping a particular strain at this point I will replate from the slant and then reslant from a pure colony (see picking colonies). From here making a pitchable quantity is relatively straight forward, just go back to the section on making a starter from slant or plate and follow from 2nd stage propagation.
If you follow the above advice you will create pitchable quantities of yeast from just about any source you can find. If you research this subject you will see advice that may conflict with what is here but the bottom line is if you follow the methods above and your aseptic technique is basically sound you will succeed far more often than you fail, just always make sure you have a few samples of the same yeast or if disaster strikes you have a dried yeast ready to take over.
For a much more sophisticated discussion of all things yeast then Yeast by Chris White & Jamil Zainasheff is highly recommended.
Good Luck!
Ashley Carr
February 2021